Ok,
First of all, you should only attempt this if you know what you are doing! This invalidates all your warranties; also be careful you don't injure yourself or cause damage to your Drobo - obviously taking apart anything and replacing parts can be dangerous...
I had to do because the noise of the fan was driving me mad!
Anyway, let's start. First power down your Drobo and disconnect the leads and remove the hard drives. Take off the front plate and you should have something that looks like this:

Now, turn the Drobo upside down:

Once you've done that, you will see the 4 feet and an additional screw, these can now all be removed:

You external metal casing will then slide off:

Once you've fully taken it off, it will look like this:

Now that you've done that, turn the Drobo back over on to it's base again. You will then need to remove the drive caddy. This can be accomplished by "popping out" the little plastic tabs indicated. There is one of each side and one at the top. Be careful at this point as you don't want to break these, just make them pop out of the mounting holes:

and the other side:

You can see me here using a screw driver to gently pop it out:

Once you've popped these, gently push in the last one on the top:

The drive caddy can now be gently pulled out:

Now at last, you can look inside the cute little unit:

The next step is to remove the back place. This is held together by four little tabs, look inside and you'll see two of them at the back of the unit at the top:

Reach in with your hand - careful though, as there are a few sharp edges in here - and gently push the tabs out. The other two tabs are located on the outside, at the back and the bottom of the unit, one on each side:

Here you can see it before it pops:

And after you've popped it (with a screwdriver):

The back plate now comes off easily, just pull:

Almost done! The last part now is to remove the top and back. This essentially just slides back although it can be a bit stiff, so a little encouragement is needed with the old screwdriver. Insert it into the gap and twist slowly, being careful not to bend the metal. Once you've done that, the back should start to slide back:

The top and back should now slide back as illustrated below:

Here's is the slide back in action:

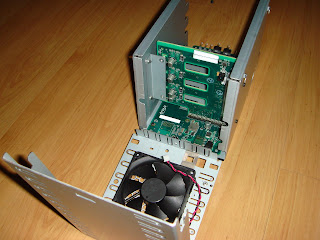
Careful sliding this back and the fan is connected to the board inside the Drobo; but there should be enough give, just do it slowly. Then, low and behold, it's free:

At least, you can see Drobo's bottom :-) :

And you're done, the Drobo is now open and you can bask in it's naked glory:

Obviously, to put things back together again, just run the same process but in reverse. For those of you who are interested, I exchanged the fan with a Noctua NF-R8 (www.noctua.at) which is a reasonably high throughput quality low noise fan - I now have a silent Drobo!! Peace at last! Note though, the Drobo does not use a standard fan connector so you will need to re-use the old one - either by recrimping it with the appropriate tool, or some other creative mechanism. Will see how things go and keep you posted - oh another small tip, the fan in the Drobo is held on with these cool little clips, you just need to push them in from the inside out for the clip to pop out and free the fan. I didn't reuse these, I prefer some new rubber mounts, but you can reuse these just by popping them back in.
Update
For those of you who want to know, here is a picture of the stock fan I removed from the Drobo:
